GenoFinisher
GenoFinisher is a tool to draw contig graphs combined with various functions to perform finishing efficiently.
How to get started
Three files (454ContigGraph.txt, 454AllContigs.fna, and 454AllContigs.qual) from newbler placed in a single folder are required. Three files (454Scaffolds.txt, 454Scaffolds.qual, and 454Scaffolds.fna) are optional. A folder named "pairReads" can also be placed in the folder, to which files containing pair of reads in the multi FASTA format are stored (see below). If you are not using newbler but have an Ace file created by other kind of assembler, try AceFileViewer to create the three files from the Ace file.
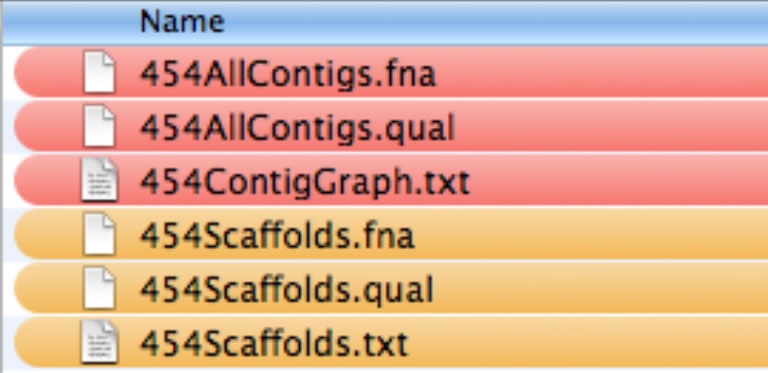
The three required files are shown in red, and three optional files in orange.
In the main window, select the folder and press the run button to start calculations. Please wait for a while until the calculations are done. Two or three windows will appear. These are the main window, windows for task1 and task2. The task2 window appears when the three optional files were provided.
How to draw contig graphs
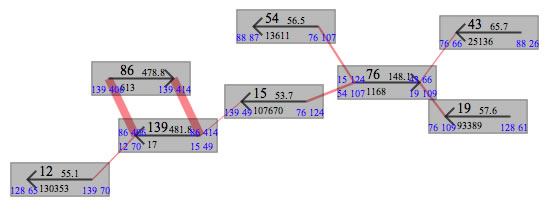
Contigs in the main window.
In the windows, rectangles will appear. These are contigs. A contig number, the sequence depth, the length of contig are indicated. The arrow drawn on each contig indicate the direction of contig. All contig connections between contigs are hidden for the first time. To show them, select a menu ("show connections") form the context menus of contigs. The width of red line connecting two contigs are proportional to the number of reads connecting them. When the width is too thin or too thick, the color of lines is not red anymore, and width of line will be set to a value defined in the setting window(command + ,). You can draw a contig graph by moving contigs. The contigs could be moved as you move rectangles on graphics drawing tools. There are some context menu to bring related contigs to the proximal location. In case when contigs are placed out of the drawing area press the "adjust frame" button.
The color of contig can be changed. Select the "contig info" from "tools" menu. You can also leave a note to remember something. The color is set by a string, which indicates a color. The relationship between strings and colors can be set in a window that opens by command + K.
Task1 window
The task1 window is consisted of several sheets. Press forward or backward buttons located top-left conner to change the sheet. In each sheet, a repeat contig (or repeat contigs) and its flanking contigs are displayed. You can also move the contigs as in the main window. In the Task1 window (and also in the Task2 window), repeat contigs and non-repeat contigs have magenta and green borders, respectively. You can change the state (repeat or non-repeat) of contig from the context menu.
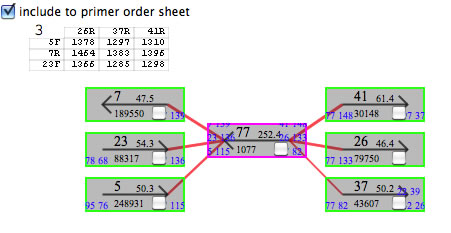
A sheet appeared in the Task1 window. Contig77 is a repeat contig, and there seems to be three copies of it in the genome.
There is a check box at the top-left corner of each sheet. If you think a sheet shows a repeat induced problem and it should be solved by PCR, keep the checked state. If you don't, uncheck it. After reviewing all of the sheets, select all and copy and paste the contents of the text field placed in the bottom left part of the window to a spreadsheet. These data include PCR experiments designed to solve repeat-induced problems (an example is here).
Note that some repeat contigs have unique variation bases, which can be used to identify an order of contig without doing PCR experiments. (see AceFileViewer).
In each sheet, there is a chart indicating the combination of primers to be used for PCR. In each cell of the chart, an expected PCR product size is indicated (if multiple sizes are possible an asterisk (*) is shown. You can see the expected sizes from the context menu of the cell). After identifying the actual contig connections, select cells representing the connections (select from the context menu if multiple sizes are possible). By pressing the button entitled "Finish ALL" the contigs in the specified contig routes are combined and combined contigs will appear in the main window. In the contig rectangles in the task1 window are check box. The contigs with the check box checked will be removed from the main window as you press the "Finish ALL" button. As this action is not reversible, be sure to save the project before doing this. <Important> As stated in the manual for AceFileViewer, it is possible that all copies of a repeat contig are not identical. Hence, connecting contig sequences in this fashion might result in a situation identical DNA sequence of across all copies of a repeat.
Gluing contigs in the main window
To combine two contigs in the main window, select two contigs while pressing the command key. The contigs thus selected will have a red border. Then press a button entitled "combine contigs".
The other way to combine contigs is to open a dedicated window from the tool menu. In the window set an order of contigs with the direction of contig marked by + or -. For example, "15+ 30- 35+ 16+"(space delimited). If you want to remove some contigs when the specified contigs are combined, set the number of contigs to be removed in the separate text field (for example, "30 35").
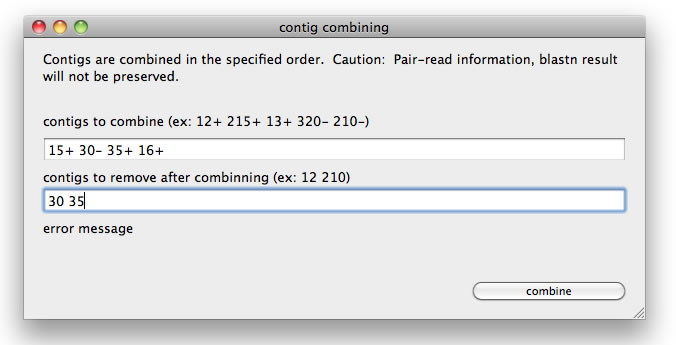
A window to combine a lines of contigs.
Editing contig DNA sequence
By selecting a context menu of contigs, you can load the sequence to a dedicated sequence editor. In the editor is a variety of functions that will help you from different aspects.
- (1) blastn results can be seen as background colors of bases.(DNA sequences of each contig was blastn-compared against all contigs).
- (2) You can reverse complement the sequence, by simply checking a check box.
- (3) You can put colors to bases.
- (4) You can find a DNA sequence and put a color to found ranges.
- (5) When you select a tract of DNA, calculated Tm value of the tract is displayed immediately.
- (6) You can edit the DNA sequence.
- (7) Bases with a quality score lower than a threshold are highlighted in green.
- (8) Positions of base with a quality score lower than a threshold can be reported.
- (9) The quality score distribution can be reported.
- (10) You can select a tract of DNA and replace it with a DNA sequence you specify.
- (11) "Patches of DNA sequence" could be used to replace similar DNA sequence (see below).
- (12) Bases you manually set will have a quality score of 99. Making it possible to track such regions.
To patch, prepare a unique DNA sequence that matches at 100% query coverage (but not at 100% identity) to a single location in the contig sequnece. In the patching, a patch DNA simply replaces its counter part in the contig DNA sequnece. As the detection of similarity is based on blastn, DNA patches must be similr enough to the contig DNA sequnece. You can set multiple patches at once.
Other data source
As mentioned above, you can place a folder named "pairReads" and place files containing pairs of reads in the multi FASTA format. In this case, when pressing the run button, two reads of each pair are searched for identical sequence in all contigs. If the two reads are uniquely mapped to different two contigs, the two contigs are related by the pair. In this way, the number of pairs connecting two contigs are counted. The counted value can be displayed by a curved lines connecting two contigs.
You can load a file named "connectioninfo", which is an output file of AceFileViewer (command + I). This file is created when an ace file was examined by AceFileViewer. This file contains information on (i)number of pairs that connect a pair of contigs, and (ii)number of flow-through reads.
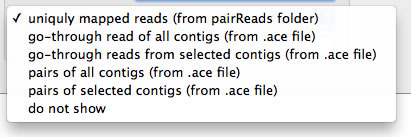
A pull down menu in the main window to select which information to display.
From the pull-down menu, you can set which information to display. The curved lines connecting two contigs will appear. It is also possible to display lines relevant to a contig or contigs. For examples, setting "10" shows lines relevant to contig10, and setting "12+" shows lines starting from the 3' end of contig12. You can also set conditions as "10+ 11-".
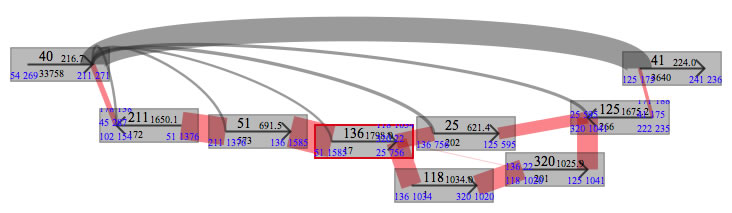
Example of how pair data are shown. Here, contig40 and contig41 are non repeat contigs and complex of repeat contigs are located between them, and "40+" is set. It seems obvious that contigs 118 and 320 are not to be placed in this gap.
Scaffolds
When the three optional files were provided, larger rectangles will appear. These are scaffolds.
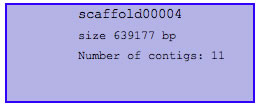
Appearance of a scaffold.
The scaffolds often have gaps in it, and one of the major tasks for finishing is to close such gaps. In some cases, to the gaps in scaffolds fit a repeat contig (or complex of repeat contigs). Whether or not a gap in a scaffold was caused by repeat can be confirmed by examining the contig graphs in the Task1 window. For each gap in scaffolds, GenoFinisher searches contig paths that connect the pre-gap and post-gap contigs, and display the paths in the Task2 window.
For each scaffold, the path beginning from the last contig of the scaffold and ending in the initial contig is also searched. This is because some scaffolds represent a circular entity.
It should be taken into account that each repeat DNA sequence is made form several copies of a repeat that are not always identical to each other. It means that DNA sequences of repeat contig should carefully be examined before use. AceFileViewer can find the base variations among the copies of a repeat.
Once DNA sequence of a gap was determined correctly, the corresponding Ns in the scaffold DNA sequence can be replaced by an exact DNA sequence, which could be done in the Task2 window. It is also possible to edit the DNA sequence of scaffolds by selecting a context menu of scaffolds to open a window for sequence edition. In the window, a DNA region corresponding to a contig or a gap can be selected from a pull down menu.
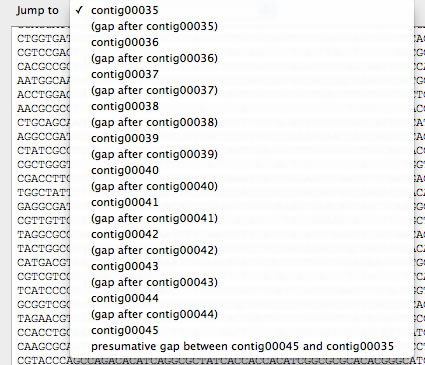
Pull down menu to select a contig or a gap in a scaffold. Because sometimes ending contig of a scaffold is connected to the beginning contig of the scaffold, such presumed location can also be selected (the last menu).
You can also search paths connecting two contigs. To do so, select two contigs while pressing the command key, and the press the button entitled "route selected contigs". A sheet will be added to the Task2 window.